![(please configure the [header_logo] section in trac.ini)](/chrome/site/cardinal.gif)
Updating an 825 indicator
If you have an indicator that is out of date and you want to do a complete upgrade follow the instructions below.
Configuring a USB flash drive for 825 updating
- Download the appropriate Cardinal 825 update pack from the link below:
| 825 version 1.12.033 | 825 for SIB card SWIM or ICAN operation |
| 825D (DLC) version 1.12.032 | 825D DLC operation (also supports SIB card - DOES NOT SUPPORT SWIM) |
825D software no longer supports old style 2010 and earlier mainboard DeviceNet communications. 825D software does not have support for ICAN.
The downloaded zip file contains all the files needed to upgrade your indicator (except for option card firmware) to the latest software.
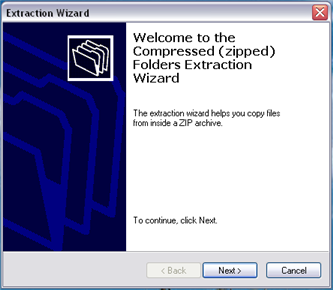
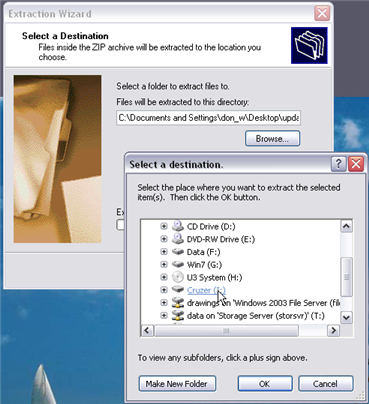
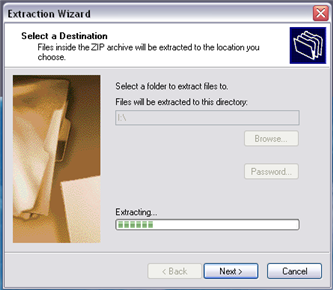
- Insert a USB flash drive into one of the USB ports on the computer. Determine the drive letter or path to the USB flash drive. Remove any existing 825 update files from the flash drive. Unzip the contents of the previously downloaded zip file to the USB flash drive. For example, if your flash drive is drive F: then you would unzip the contents of zip file to root directory of the F: drive. If you are using Windows XP right-click the zip file and select "Extract All..." Click "Next". Click "Browse..." Select "My Computer" and then select the appropriate drive letter of your flash drive. Click "OK." Click "Next". Click "Finish".


- After the files are unzipped you should have three files on your flash drive: "upd825.sh", "loadsrec", and "os825_xx_yy_zzz.825". If using Windows XP click the system tray icon to "Safely Remove Hardware" and select the appropriate item to remove the USB flash drive.

Performing a FULL Update
WARNING: BACKUP ANY DATA FILES AND CUSTOM PROGRAMS YOU WISH TO KEEP!
WARNING: Insure that reliable power is available before attempting the upgrade. A power interruption during the upgrade process could render the 825 inoperable and require return of the 825 to the factory for reprogramming!
- Make sure the 825 is powered off. Remove the four acorn nuts securing the bottom access cover and remove the cover to reveal the USB and network connections.
- Turn on the 825. Select "Application Mode". Watch the display carefully. When the display shows "U = Update" press the "U" button on the 825 keypad. If ">>>>>>" is seen instead of "U = Update" the update prompt is disabled in the loader settings "Preferences" and "Startup Setup". (If "U = Update" does not appear your indicator may have an older OS - refer to "Advanced Updating" then repeat this process after the OS is updated).
- The display may prompt for a login. If the login has not been changed use the default administrator login: "ADMIN" and "81440".
- The display will show "Update from USB flash? (Y/N)". Press "Y".
- The display will show "Insert USB flash containing /upd825.sh - Press any key". Insert the USB flash drive previously configured for 825 updating. Be careful to insert it in the correct orientation into either of the USB slots. After the USB flash drive is properly inserted press any key such as the "ENTER" key on the 825 keypad.
- The display will show "Mounting USB flash" and if successfull will then show "UPDATE FLASH", "Replace:" and show "Loader", "OS", and "Main Bd" with "Yes" or "No" shown to the right of each. If they are not all showing "Yes" the Up/Down navigation keys may be used to highlight each item and press "Y" to change the selection to "Yes". Press ENTER. The display will show "Checking file CRC..." When finished it will show "* DO NOT TURN OFF POWER DURING UPDATE *" and "Proceed (Y/N)?". Press "Y" to proceed.
- The display will show counts as the update is performed. It may take 10 minutes or more. When finished the display will show "Done". Remove the USB flash drive. Press a key and the 825 will reboot.
- The display will show "Restarting" briefly and then the 825 startup screen will appear. The "Loader:" "OS:" and "Mainboard" version displays should show the correct updated version numbers.
- If it is desired to clear the NAND storage memory use the "Configuration" selection from the "Application Menu". Select "Set Factory Defaults". Follow the on screen instructions. This will delete all program data, and all custom application programs.
Updating a DLC option card
Click this link for information about updating the DLC option card
Updating 825 option cards
825 Option cards cannot be updated automatically using the USB update pack. Except for the DLC card, firmware updates to the option cards require an ISP (In system programming) hardware interface and appropriate software to perform the update.
Advanced Updating
Older 825 indicators from 2010 or earlier may not have the "U" update option during start up. Also if a weight indicator has corrupted memory it may be impossible to get to the OS to perform the update. Click this link for advanced updating
Version History
Attachments (4)
- welcome_compressed_files.png (37.4 KB ) - added by 16 years ago.
- zip_select_dest.png (109.1 KB ) - added by 16 years ago.
- zip_extracting.png (59.8 KB ) - added by 16 years ago.
- safely_remove_usb.png (3.2 KB ) - added by 16 years ago.
Download all attachments as: .zip