![(please configure the [header_logo] section in trac.ini)](/chrome/site/cardinal.gif)
Updating Legacy 825 Apps to run on 825 Gen2
Project Changes
- Run the new 825 development environment VM (Virtual Machine). Open the Eclipse IDE (Integrated Development Environment).
- Select "File" "Import" to import legacy project such as from USB flash. Alternatively, if the project is available in an SVN repository use "File" "New" "Project" "Checkout the projects from an SVN" to checkout the project.
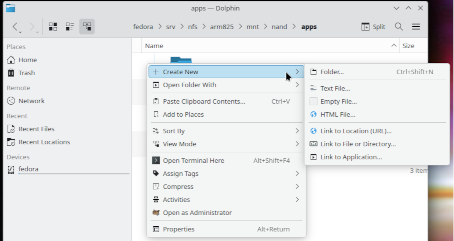
- In the "Project Explorer" pane right-click the project and select "New" "Folder". At the "Folder name:" prompt type "app". This folder will be used to contain the compiled output files.
- Right-click on the project in Eclipse and select "Build Configurations", "Manage..."
- Click "New..." and type for the "Name:" input "Debug-ARM825". Select "Copy settings from "Existing configuration - Debug". Click "OK".
- There is now a duplicated build configuration. We will change this configuration to compile for the new 825.
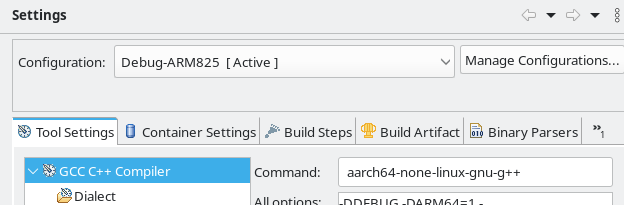
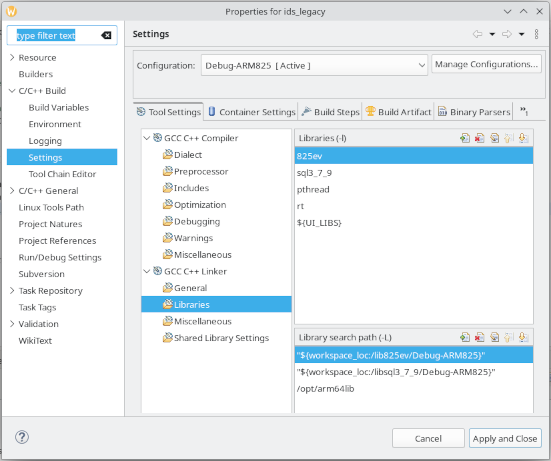
- Right-click on the project and select "Properties...", Select "Settings". Make sure the "Configuration" is selected as "Debug-ARM825" and click the "Tool Settings" tab.
- Some projects might have "Cross Settings" under "Tool Settings". If so change the "Prefix" from "m68k-uclinux-" to "aarch64-none-linux-gnu-" (Be sure to not leave out the final minus sign). If the "Cross Settings" is in the project the following steps 9-12 may then be skipped.
- Select "GCC C++ Compiler". The "Command:" will show "m68k-uclinux-g++". Change this to "aarch64-none-linux-gnu-g++". This changes the compiler to compile for the ARM64 architecture.

- Select "GCC C++ Linker". The "Command:" will show "m68k-uclinux-g++". Change this to "aarch64-none-linux-gnu-g++". This changes the linker to link the project for the ARM64 architecture. Linking is the process of combining the already compiled code modules and libraries to create the executable.
- In some cases the project may also have a "GCC C Compiler". If so change the command to "aarch64-none-linux-gnu-gcc".
- In some cases the project may also have a "GCC Assembler". If so change the command to "aarch64-none-linux-gnu-as".
- Click "Apply".
- Go back to "Tool Settings" and under "GCC C++ Compiler" select "Include paths". Click the green plus icon to add a path. Add the path "/opt/arm64include". If there is a "GCC C Compiler" section also add this path to the includes there.

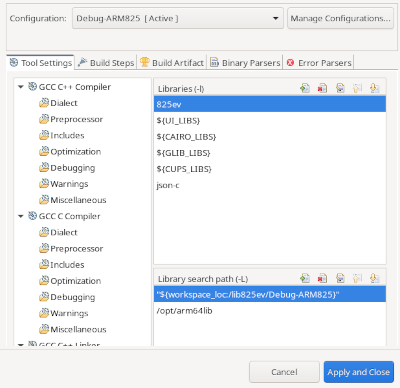
- Under the "GCC C++ Linker" select "Libraries". If libraries "pthread" and "rt" are not already listed add them. Add "${UI_LIBS}". The "${UI_LIBS}" is a code to use the environment variable "UI_LIBS" in the list. This environment variable is preconfigured in the development VM to specify multiple user interface libraries. Also add lines "${CAIRO_LIBS}", "${GLIB_LIBS}", "${CUPS_LIBS}", and "json-c". The "${CUPS_LIBS}" and "json-c" may not be needed for all recompile projects.
- Under "Library search path". Edit existing library paths as appropriate. For example change "${workspace_loc:/lib825ev/Debug}" to "${workspace_loc:/lib825ev/Debug-ARM825}"
- Click the green plus icon and add the library path "/opt/arm64lib"

- Under "GCC C++ Compiler" select "Preprocessor". Click the green plus icon to add the symbol "ARM64=1" This is used for conditional compilation. If there is also a "GCC C Compiler" section select "Preprocessor under that and also add the symbol "ARM64=1".
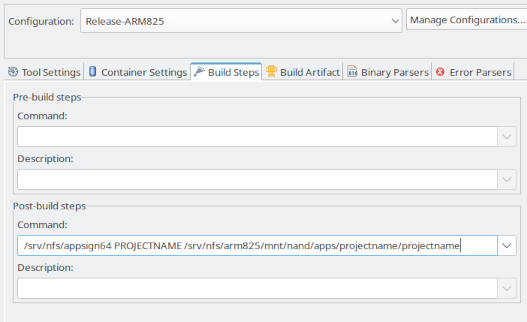
- Make sure the app folder is at the same level as the src folder. Click the "Build Artifact" tab. Change the output prefix to "../app/". This is where the completed app will be placed. Click "Apply". Click the "Build Steps" tab. At the "Pre-build steps" "Command:" prompt type "sudo mntappdir <appname>". When the project is built this script will create and mount a /srv/nfs/arm825/mnt/nand/apps/<appname> folder so that it points to the same location as the app folder in the workspace. Using this path will make it easy to test from an SSH connection into the 825. After the build configuration is built performing ". test825 <ipaddress of VM>" from an SSH connection to the 825 will automatically mount and change directory to /mnt/nfs/arm825/mnt/nand/apps path on the 825 which will be the parent directory of the project. From SSH then type "cd <projectname>" to enter the app directory for the project. Type "./<projectname>_dbg" to launch the app.
- Click "Apply and Close".
- Also create a "Release" build. Repeat the steps above from step 4, except name the build configuration "Release-ARM825" and copy the configuration from the "Release" build configuration. For the "Library search path" standard libraries change them to "Release-ARM825". The debug build will output messages from DEBUG_MSG statements in the code on the console. These messages are useful for debugging. These messages will be left out when the release build is compiled. The release build executable will often be a smaller size file and may have improved speed. The release build must also be tested as it is possible for problems to only show up in a release build.
- The "Post-build" step for the signature file should also be set or modified for the release build to run "appsign64" to create the signature file so that the app will show as a legitimate app in the application menu.

Once you are familiar with these steps the 825 Gen2 Project Reference may be all that is needed to quickly setup your project build configurations.
Source Code Changes
A few source code changes may be needed for proper operation on the 825 Gen2.
- If the app has USB import/export features it may use a fixed path "/mnt/fl1" for the USB drive. The USB drive path will not be the same on the 825 Gen2. Search the project for the string "/mnt/fl1" to find any code that should be changed. The library lib825ev has a function called FindFlashDrive for the 825 Gen2 to get the path string. The path may be similar to "/run/media/sda1" but it is best to use the FindFlashDrive function instead of a hard coded path.
- Some apps may use a fixed outdated file path "/dev/com3" for COM3 serial communications. This should be updated to use the CCommSerial class. For example:
CFile file;
file.Open("/dev/com3", "w");
if(file.IsOpen()) {
   string str = FormatWt(GetGrossWt(1), GetInterval(1), GetDecimal(1), 5) + "\r\n";
   file.Write(str);
}
Update this to:
CCommSerial file(3);
file.Open();
if(file.IsOpen()) {
   string str = FormatWt(GetGrossWt(1), GetInterval(1), GetDecimal(1), 5) + "\r\n";
   file.Write(str);
}
- Some apps may use a fixed file path "/dev/usb/usblp0" for USB printer support. The 825 Gen2 path is "/dev/usb/lp0". Update this code such as:
  char printPort[18];
#if ARM64
  strcpy(printPort, "/dev/usb/lp0");
#else
  strcpy(printPort, "/dev/usblp0");
#endif
- The 825 Gen2 defaults to 12 hour time which requires AM/PM labels to show the date/time. Legacy 825 indicators defaulted to 24 hour time. Many legacy apps do not allow for enough space to display the AM/PM labels. So slight modification of the date/time display code may be needed to accommodate 12 hour time.
void ShowDateTime(void)
{
        SetBkColor(COLOR_ATTENTION);
        SetCurColor(nColorBlack);
#if ARM64
        char dt[32];
        GetDateTimeStr(dt, 1);
        // Use strlen to allow for 12 hour time am/pm indication
        DisplayText(DSP_WIDTH_LEGACY - ((strlen(dt) + 1) * FONT_WIDTH), DATE_Y, dt);
#else
        DisplayText(DATE_X, DATE_Y, GetDateStr());
        DisplayText(TIME_X, TIME_Y, GetTimeStr(1)); // Parameter 1 = Include seconds
#endif
        SetBkColor(nColorBlack);
}
Some legacy apps may have database or other code that expects the 24-hour time preference. In this case it may be best to document that the indicator preference must be set for 24-hour time. It is also possible to check this upon application startup and provide an error message if the preference is 12-hour time. For example:
if(((struct param_struct*)PARAM_ADDRESS)->datetime_pref.timefmt != 0) {
   DrawErrorBox("Preferences must be set for 24-hour time", 8);
   exit(0);
}
- Some apps may have stime function call to set the indicator date/time. This is often in local/remote code for the remote indicator to set its time from the local indicator. The stime function was deprecated and is removed from standard libc library. This code may be updated to use clock_settime. For example:
As of 2025-11-20 lib825ev and lib825 libraries provide their own stime functions for 825 Gen2 builds so it will not be necessary to make this code change. However, for new apps it is recommended to use clock_settime.
// stime(&rawtime);
struct timespec ts;
ts.tv_sec = rawtime;
ts.tv_nsec = 0;
clock_settime(CLOCK_REALTIME, &ts);
- Also (probably rare) if the app communicates with another system by serial port, network, or file import/export that interprets the data content as binary integers, floats, etc... it may be necessary to make changes to account for different endianness. The 825 Gen2 is ARM-64 little-endian, The Legacy 825 is Coldfire big-endian.
Compiling
Right-click on the project and select "Build Configuration", "Set Active", and "Debug-ARM825". Right-click on the project and select "Build Project".
Right-click on the project and select "Build Configuration", "Set Active", and "Release-ARM825". Right-click on the project and select "Build Project".
Debugging
SSH into the 825 Gen2 indicator. For example, if the 825 Gen2 IP address is 10.1.2.230:
PS C:\> ssh admin@10.1.2.230
admin@10.1.2.230's password:
card825gen2:~$
Run the test825 script on the indicator to close the current session and connect to the NFS file share on the development VM. For example, if the 825 development environment VM is IP address 10.1.2.75:
card825gen2:~$ . test825 10.1.2.75
Be sure to include the "." period before test825. This is necessary so that environment variables set with the script are retained outside of the script.
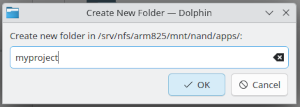
Before running the app for debugging from SSH it will often be necessary to create a directory on the 825 Gen2 for the app's data. Check the app header files to confirm the directory the app will use for configuration and data files. (The last part of the directory should normally match the project name and the release build executable name. Some newer apps may automatically check when starting up and create the directory if it does not exist)
mkdir /mnt/nand/apps/<projectname>
If the data directory does not exist when running the app it is likely the display will show error messages about failing to write/read setup, configuration, or database files.
It is often desirable to add the command to the app startup code to check and create the directory if it does not exist.
main()
{
   // ...
   MakeDirIfNotExists("/mnt/nand/apps/<projectname>");
   // ...
}
Change directory to the directory containing the app on the VM.
card825gen2:/mnt/nfs/arm825/apps$ cd /mnt/nfs/arm825/mnt/nand/apps/myapp
Run the debug build
./myapp_dbg
Any debug messages provided in the code such as DEBUG_MSG("Showing main screen\n"); will show on the terminal as the app runs. It is best to exit the app by an "Exit" or "ESCAPE"/"Left Arrow" button on the 825 Gen2 screen. Using CTRL-C in the terminal to exit will not perform normal app shutdown and may leave mainboard communications in a bad state.
A legacy 825 app recompiled to run on the 825 Gen2 may appear similar to this:

Project Settings Reference
The 825 Gen2 Project Reference provides helpful information to get 825 Gen2 apps up and running quickly.
Next Steps
Creating a simulator build configuration is also useful. Refer to Simulating 825 Gen2 Apps for information about setting up a simulator build configuration.
Also a next step may be: Updating Legacy Apps to New Look
Attachments (8)
- 825_id_storage_legacy.png (32.8 KB ) - added by 2 years ago.
- ids_legacy_includes.png (75.7 KB ) - added by 2 years ago.
- arm64_cpp_compiler.png (23.9 KB ) - added by 2 years ago.
- 825ids_legacy_libs.png (82.0 KB ) - added by 2 years ago.
- 825gen2_createappfolder.png (41.6 KB ) - added by 17 months ago.
- 825gen2_createappfolder2.png (13.4 KB ) - added by 17 months ago.
- 825gen2_libs.png (52.4 KB ) - added by 17 months ago.
- 825gen2_buildsignature.png (38.4 KB ) - added by 17 months ago.
Download all attachments as: .zip